Meta Description: Learn how you can be prepared during emergencies with this step-by-step guide on performing CPR. Enroll in a training program today!
CPR, or Cardiopulmonary Resuscitation, is a life-saving technique that everyone should know. In this guide, we’ll walk you through the 5 steps of CPR in a simple and engaging way. From assessing the situation to using an Automated External Defibrillator (AED), each step plays a vital role in giving someone a fighting chance at survival. So let’s dive in and equip ourselves with the knowledge to be prepared during emergencies!

Content
Assess the Situation
When faced with an emergency situation, it is crucial to assess the scene before taking any action. This step ensures your safety and helps you make informed decisions on how to proceed. Let’s dive into the details of assessing the situation during CPR.
Firstly, take a moment to evaluate your surroundings for potential dangers or hazards. Look out for things like fire, traffic, or electrical wires that could endanger both you and the victim. Your safety should always be a top priority.
Next, check if there are any immediate threats present that may harm you or others nearby. If necessary, move yourself and the victim away from danger while being mindful of any possible neck or spine injuries they may have sustained.
Once you’ve ensured everyone’s safety, it’s time to call emergency services right away if needed. Dial the local emergency number (such as 911) and provide them with accurate information about the situation at hand. Remember to stay calm while communicating with the operator so they can assist you effectively.
If there are other people around who can help, assign specific tasks such as calling for help or finding an Automated External Defibrillator (AED). Dividing responsibilities can ensure a quicker response and increase the chances of saving a life.
Check Responsiveness
When it comes to performing CPR, the first step is to check if the victim is responsive. This crucial step helps determine whether they need immediate medical attention. Let’s delve into how you can effectively assess the victim’s responsiveness.
Begin by gently tapping or shaking the person and calling out loudly to them. The goal here is to stimulate a response from the individual. If there’s no response, try different methods of stimulation like lightly pinching their earlobe or applying pressure on their collarbone.
It’s important to remember that getting a response from the victim is essential before proceeding further with CPR. A responsive person may exhibit signs such as blinking, groaning, moving, or even opening their eyes. These indications suggest that they are conscious and breathing.
If you receive any form of response from the victim, encourage them to stay still and wait for professional help to arrive. It’s crucial not to leave them unattended during this time.
However, if there is no response at all, immediately proceed with CPR starting with chest compressions as directed in subsequent steps we will cover later on in this guide.
Open the Airway & Check the Breathing
When providing CPR, the next step after assessing responsiveness is to open the victim’s airway and check for breathing. This crucial step ensures that oxygen can flow into their lungs effectively. Let’s dive into a detailed guide on how to perform this step correctly.
To begin, gently tilt the victim’s head back by placing one hand on their forehead while using your other hand to lift their chin upwards. This maneuver helps align the airway for better airflow.
Once you’ve tilted your head back, it’s time to check for breathing. Look closely at their chest and abdomen for any signs of movement indicating normal breathing. Also, listen attentively for any sounds of exhalation or inhalation.
Remember, effective airway management is crucial during this step because an obstructed airway can prevent proper respiration even if circulation is restored through CPR techniques like chest compressions.
If you notice no signs of breathing or abnormal breath sounds from the victim, it is essential to initiate rescue breaths as part of CPR immediately.
If you notice regular breathing and no obstructions in someone’s airway, it is crucial to place them in a recovery position. This position helps maintain an open airway while allowing you to monitor their condition until professional medical help arrives. To learn more about proper recovery positioning and other essential CPR techniques, visit cprcertificationnow.com for comprehensive resources and guidance.
Perform Chest Compressions
Performing chest compressions is a vital step in CPR that helps circulate blood to the vital organs when the heart has stopped beating. Let’s walk through clear instructions on how to perform chest compressions correctly, ensuring maximum effectiveness.
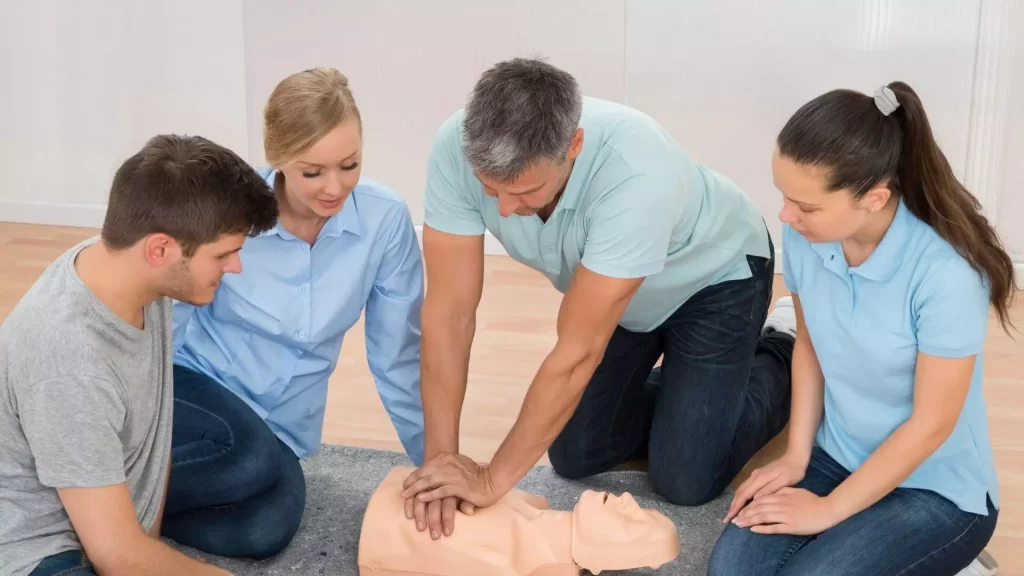
To begin, position yourself above the victim’s chest with your knees beside their shoulders. Place the heel of one hand on the center of the chest, slightly above where the lower ribs meet. Interlock your fingers and keep them off their chest for optimal compression depth.
Once you have established proper hand placement, it’s time to apply downward pressure using your body weight. Push down firmly with straight arms, allowing the chest to fully recoil between each compression.
For effective compression technique:
- Aim for a depth of at least 2 inches (5 centimeters) but not exceeding 2.4 inches (6 centimeters). This ensures adequate blood flow.
- Maintain a compression rate of around 100-120 compressions per minute. Think about humming “Stayin’ Alive” by Bee Gees as a helpful rhythm guide.
- Emphasize avoiding interruptions during compressions as much as possible since consistent circulation is crucial for survival.
Remember that interruptions in compressions can significantly reduce blood flow and decrease chances of resuscitation success.
Continue performing uninterrupted cycles of compressions until professional help arrives or signs of recovery are observed from the victim.
Deliver Rescue Breaths
Delivering rescue breaths is a crucial step in CPR that helps provide oxygen to the victim’s lungs when they are unable to breathe on their own. Let’s explore a guideline for giving rescue breaths using mouth-to-mouth or mask techniques, ensuring proper airway management throughout.
When it comes to delivering rescue breaths, maintaining an open airway is of utmost importance. Ensure the victim’s head is still tilted back and their chin lifted upward from earlier steps.
If you’re comfortable with it, you can use the traditional mouth-to-mouth technique:
- Pinch the victim’s nostrils shut with your fingers.
- Take a normal breath and place your lips securely over their open mouth.
- Blow steadily into their mouth until you see their chest rise visibly.
- Remove your lips and allow the chest to fall naturally before repeating.
Alternatively, if you have access to a mask specifically designed for CPR:
- Position yourself above the victim’s head.
- Place the mask over their nose and mouth, creating a seal without pressing too hard on their face.
- Deliver two slow breaths by squeezing the bag attached to the mask while observing the visible chest rise.
Remember that during this process, maintaining an open airway remains important as it ensures the effective delivery of oxygen into the lungs.
After delivering each set of rescue breaths, resume cycles of compressions following recommended ratios until professional help arrives or signs of recovery are observed from the victim.
Conclusion
Mastering the 7 steps of CPR is a life-saving skill that empowers you to be prepared during emergencies. From assessing the situation to delivering rescue breaths and performing chest compressions, each step plays a critical role in giving someone a fighting chance at survival. Enroll in CPR training today and become a hero!
FAQs
Is it necessary to assess the situation before performing CPR?
Yes, assessing the situation helps ensure your safety and enables you to make informed decisions on how to proceed with CPR.
What if I can’t find an Automated External Defibrillator (AED)? Can I skip that step?
While having access to an AED is ideal, if one is not available, continue with the other steps of CPR without it. Do what you can with the resources at hand.
Should I check for responsiveness even if someone appears unconscious?
Absolutely! The step of checking for responsiveness is crucial as it helps determine whether immediate medical attention is needed or not.
How do I know if my chest compressions are deep enough during CPR?
Aim for a compression depth of at least 2 inches but not exceeding 2.4 inches. This ensures adequate blood flow while minimizing potential injuries.
Can I perform rescue breaths without tilting the head back or lifting the chin in open airway management?
No, maintaining an open airway by tilting the head back and lifting the chin upward allows for proper ventilation when delivering rescue breaths during CPR.

Helen Bradley is a health blogger and the founder of her own blog about fitness. She has been blogging for three years now and loves to share what she learns with others. Helen enjoys reading, cooking, and staying active outdoors.


